The real-time image classification application is constructed as a minimal example of integrating a Deep Learning service into Spring Boot application. This post could be very well considered a sequel to my talk at the JavaLand conference on 14th March 2018. The goal of this post is to guide you through the code and enable you installing, modifying and running the real-time image classification application that was demonstrated in my JavaLand talk. Going through the code you can also train your own neural network and take a look at the powerful technique that is Transfer Learning.
The Real-Time Image Classification Application
The Real-Time Image Classification Application is a web app that will start your web camera and will classify whatever appears on the video feed. It has a stacked architecture consisting of frontend and backend logic. The image classification itself is encapsulated in a microservice that is consumed by the backend. At first, we use a pre-trained neural network for the classification. It can classify an image among 1000 labels. In this post, we will also apply transfer learning, train a neural network and thereby modify the microservice so that it is able to classify between 133 dog breeds.
How to install and run the Application?
On the video below you can observe the whole process of installing and running the Real-Time Image Classification Application on a freshly started Amazon AWS instance. If you are not interested in the installation process, you can skip it and only watch the classification part here: JavaLand: Real-Time Image Classification Demo.
If you are also interested in installing the Real-Time Dog Breed Classification Demo jump to How to install and run the Real-Time Dog Breed Classification?.
How does a Neural Network work?
The following slides explain the mechanics behind a Neural Network by simplifying and summarizing the online lectures of Andrew Ng. Find the full lecture here: 4.3.1 Neural Networks - Examples and Intuitions I and 4.3.2 Neural Networks - Examples and Intuitions II
Some thoughts on the Architecture
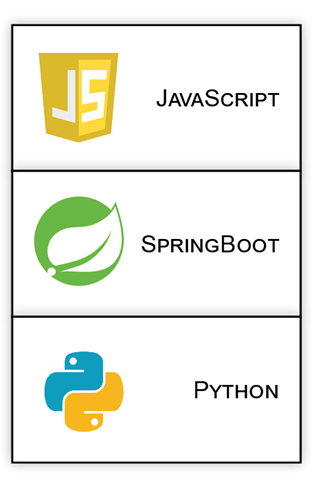
The real-time image classification application consists of three layers, which are loosely coupled through event-driven asynchronous communication. Fulfilling a different purpose, each of this three layers is implemented in a different programming language. In the following sections, you will find a brief description of each of these three layers as well as some explanations for the most interesting parts of the code.
Source Code
The source code is divided into two GitHub repositories: The generic-realtime-image-classification-webapp repo contains a Spring Boot application with a minimal JavaScript frontend, packaged as maven project. The realtime-image-classification-kafka-service repo contains the Apache Kafka configuration and two image classification services that are further discussed in the following sections.
Minimal Frontend Logic in JavaScript
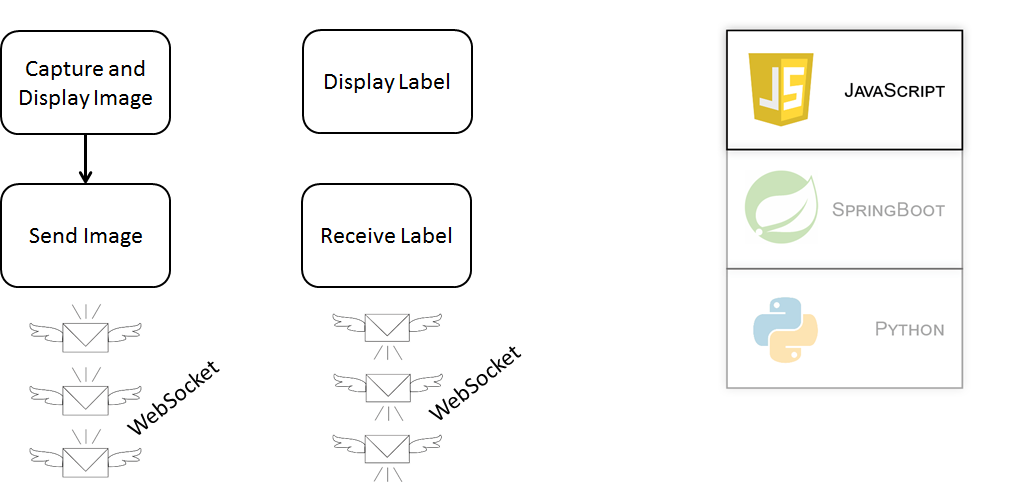
As you can see from the image above, the frontend logic that is executed by your browser is written in JavaScript. You will find the source under generic-realtime-image-classification-webapp/src/main/resources/static/assets/app.js. After loading the web page your machine’s web camera will start capturing images. Using Google’s ImageCapture library this could be achieved by only a few lines of code. Caution: while ImageCapture is natively supported by Google Chrome, it might not work in other browsers. ImageCapture is easily initialized:
function initImageCapture(){
    navigator.mediaDevices.getUserMedia({video: true})
      .then(mediaStream => {

        const track = mediaStream.getVideoTracks()[0];
        imageCapture = new ImageCapture(track);
      }).catch(error => console.log(error));
}
The image is drawn into a HTML5 Canvas and then sent to the backend given that the STOMP client is also started.
function updateCanvasAndSendImage() {

	if ( imageCapture ) {

		imageCapture.grabFrame()
		  .then(imageBitmap => {
		    drawCanvas(imageBitmap);
		    sendJPEGImage()
		  })
		  .catch(error => console.log(error));
	}

}

function sendJPEGImage(){

	if( stompClient ) {
		stompClient.send("/app/webcamimage", {}, mainCanvas.toDataURL("image/jpeg"));
	}

}
Clicking the “Connect” button on the minimalistic GUI will start the STOMP client:
function connect() {

	var socket = new SockJS('/websocket');
	stompClient = Stomp.over(socket);
	stompClient.connect({}, function (frame) {
	    setConnected(true);
	    console.log('Connected: ' + frame);
	    stompClient.subscribe('/topic/realtimeclassification', function (message) {
	    	setLabelsAndProbabilities(message)
	    });
	});

}
As you can see from the above code, the STOMP client is subscribed to a topic and waits for the classification labels to arrive.
The Spring Boot Backend
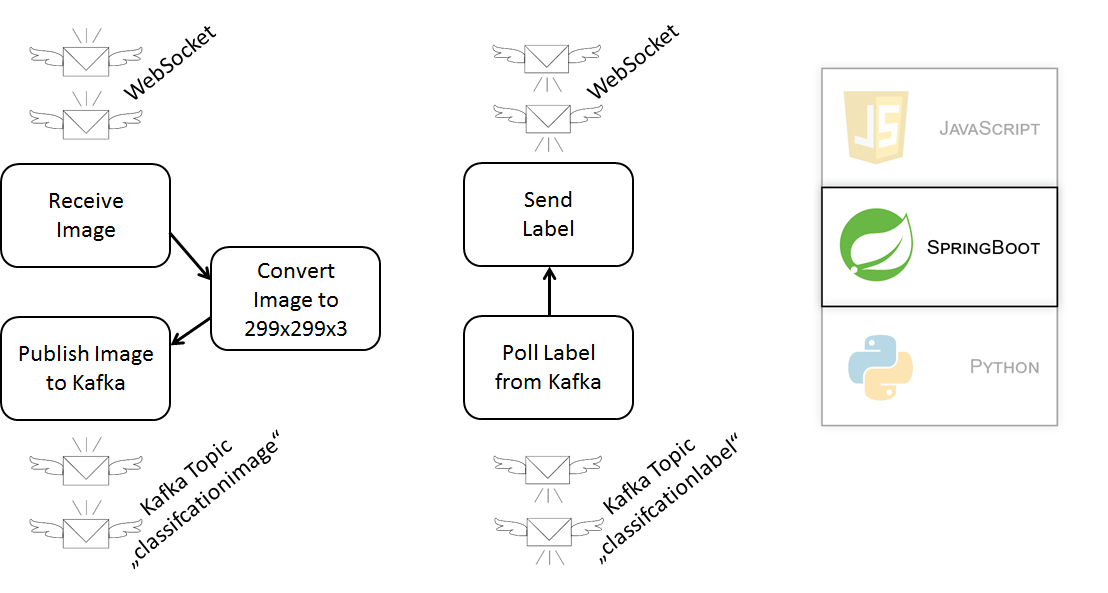
A controller in the Spring Boot backend is subscribed to the WebSocket and ready to receive the image sent by your Chrome browser:
@Controller
public class RealTimeClassificationController {

	private static final String IMAGE_PREFIX = "data:image/jpeg;base64,";

	@Autowired
	private KafkaMessageProducer kafkaMessageProducer;

	@Autowired
	private ImageConverter imageConverter;

    @MessageMapping("/webcamimage")
    public void hangleWebcamImage(String imageDataUrl) {

		if ( imageDataUrl.startsWith(IMAGE_PREFIX)){

			String originalImageBase64JPEG = imageDataUrl.substring(IMAGE_PREFIX.length());
			String resizedImageBase64PNG = imageConverter.toBase64EncodedPNG(originalImageBase64JPEG);
			kafkaMessageProducer.publish(resizedImageBase64PNG);

		}

    }

}
The controller has to process the JPEG image and convert it to PNG image with size 299x299 - the size that is expected by the neural network deployed as a Kafka service. A minimal Kafka Producer is responsible for publishing the image to the “classificationimage”-Topic:
@Component
public class KafkaMessageProducer {

	private final Logger logger = LoggerFactory.getLogger(this.getClass());

	@Value("${kafka.address}")
	private String kafkaAddress;

	@Value("${kafka.topic.classificationimage}")
	private String kafkaImageTopic;

	private Producer<String, String> kafkaProducer;

	@PostConstruct
	private void initialize() {

		Properties properties = new Properties();
		properties.put("bootstrap.servers", kafkaAddress);
		properties.put("acks", "all");
		properties.put("retries", 0);
		properties.put("key.serializer", "org.apache.kafka.common.serialization.StringSerializer");
		properties.put("value.serializer", "org.apache.kafka.common.serialization.StringSerializer");


		kafkaProducer = new KafkaProducer<>(properties);
	}

	public void publish(String base64EncodedJPEGImage) {
		logger.info(String.format(
				"Sending encoded image, broker address %s, topic %s, size %d",
				kafkaAddress,
				kafkaImageTopic,
				base64EncodedJPEGImage.length()));

		this.kafkaProducer.send(new ProducerRecord<String, String>(kafkaImageTopic, base64EncodedJPEGImage));
	}

	@PreDestroy
	public void close() {
		this.kafkaProducer.close();
	}

}
At the same time, a Kafka Consumer is subscribed to the “classificationlabel”-Topic and is waiting for labels published by image classification service. As you can see from the code above, the labels are rerouted to the JavaScript frontend without being altered in any way.
To run the Spring Boot application, navigate to the generic-realtime-image-classification-webapp and run from Maven by typing “mvn spring-boot:run”. However, you should start Apache Kafka before running the Spring Boot application, otherwise, the Spring Boot application won’t find a Kafka broker to subscribe to.
Starting Apache Kafka
Apache Kafka is very easy to run if you have docker installed. Navigate to the realtime-image-classification-kafka-service/kafka_docker_config and run “docker-compose -f docker-compose-single-broker.yml up”. In my particular case, I’am actually running “sudo docker-compose rm && sudo docker-compose -f docker-compose-single-broker.yml up” that is also contained in easy_run_kafka.sh script. You can find the minimal Kafka configuration for this demo in docker-compose-single-broker.yml config file.
The Image Classification Service
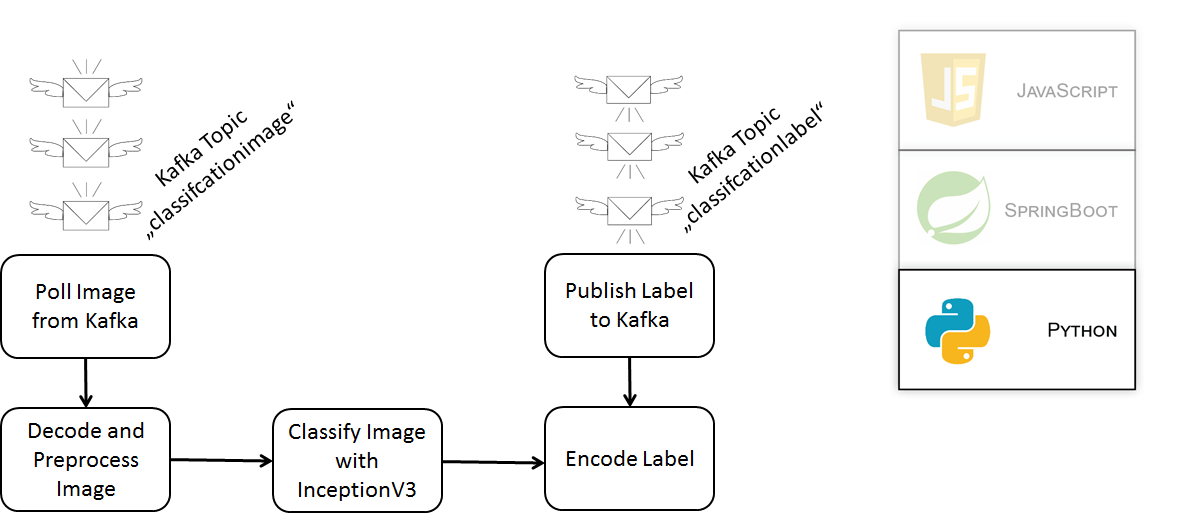
Written in Python, the actual image classification service is quite compact. With just a few lines of code the image is decoded, preprocessed, classified by InceptionV3 and the labels are published back to Kafka.
## Kafka Service
consumer = KafkaConsumer('classificationimage', group_id='group1')
producer = KafkaProducer(bootstrap_servers='localhost:9092')
for message in consumer:

    # transform image
    image_data = base64.b64decode(message.value.decode())
    pil_image = Image.open(BytesIO(image_data))
    image_array = img_to_array(pil_image)
    image_batch = np.expand_dims(image_array, axis=0)
    processed_image = inception_v3.preprocess_input(image_batch.copy())

    # make predictions
    predictions = inception_model.predict(processed_image)

    # transform predictions to json
    raw_label = decode_predictions(predictions)
    label = LabelRecord(raw_label)
    label_json = label.toJSON()

    # send encoded label
    producer.send('classificationlabel', label_json.encode())
To run the image classification service you will need Python 3.5 and also quite a lot of python libraries installed on your computer. Yet again, docker provides a shortcut. Just follow the instructions from this Kaggle blog post. However, instead running “docker pull kaggle/python” you should navigate to the generic-realtime-image-classification-webapp/python_install directory and run “sudo docker build -t “kaggleandkafka/python:dockerfile” .” This way you will also install the apache kafka client for python in addition to all the machine learning dependencies on the kaggle dockerfile. To run the service you can execute the Real_Time_Classification_Kafka_Service.py script. However, I prefer running the service from the Jupyter Notebook. In the generic-realtime-image-classification-webapp repo you will also find the service code in the Real_Time_Classification_Kafka_Service.ipynb.
Transfer Learning
If you have made it so far to run the Kafka cluster, the Spring Boot application and the image classification service, you may want to continue with this a little more advanced example of transfer learning. You can learn more about transfer learning applied to convolutional neural networks in this excellent Stanford Lecture. Download the dog images and unpack these in the generic-realtime-image-classification-webapp repo. Run the Train_Dog_Breed_Model.py script to train your own neural network that accepts the output of InceptionV3 as its input. Running this script takes more than an hour when running on my laptop. After the script has terminated you will see the newly created dogbreed_model.hdf5 file in the repo. This file contains the weights of the neural network. Now you can run Real_Time_Dog_Breed_Classification_Kafka_Service.py script to start the “Dog Breed” image classification service.
How to install and run the Real-Time Dog Breed Classification?
On the videos below you can observe the whole process of installing and running the Real-Time Dog Breed Classification Demo on a freshly started Amazon AWS instance. If you are not interested in the installation process skip the first video and only watch the classification part in the second video.
Training the Dog Breed - Second Layer Model
Load the dataset and preprocess the images into tensors that can be used as an input for the InceptionV3 network:
def load_dataset(path):
    data = load_files(path)
    dog_files = np.array(data['filenames'])
    dog_targets = np_utils.to_categorical(np.array(data['target']), 133)
    return dog_files, dog_targets

train_files, train_targets = load_dataset('dogImages/train')
valid_files, valid_targets = load_dataset('dogImages/valid')
test_files, test_targets = load_dataset('dogImages/test')

def path_to_tensor(img_path):
    # loads RGB image as PIL.Image.Image type
    img = image.load_img(img_path, target_size=(299, 299))
    # convert PIL.Image.Image type to 3D tensor with shape (299, 299, 3)
    x = image.img_to_array(img)
    # convert 3D tensor to 4D tensor with shape (1, 299, 299, 3) and return 4D tensor
    return np.expand_dims(x, axis=0)

def paths_to_tensor(img_paths):
    list_of_tensors = [path_to_tensor(img_path) for img_path in tqdm(img_paths)]
    return np.vstack(list_of_tensors)

# pre-process the data for Keras
train_tensors = paths_to_tensor(train_files).astype('float32')
valid_tensors = paths_to_tensor(valid_files).astype('float32')
test_tensors = paths_to_tensor(test_files).astype('float32')
Initialize the InceptionV3 neural network with include_top=False. Instead of a vector with the probabilities for a 1000 labels, the network will produce a tensor with size 8x8x2048.
inceptionV3 = InceptionV3(weights='imagenet', include_top=False)
# Inception Model
train_preprocessed_input = preprocess_input(train_tensors)
train_preprocessed_tensors = inceptionV3.predict(train_preprocessed_input, batch_size=32)
print("InceptionV3 TrainSet shape", train_preprocessed_tensors.shape[1:])
test_preprocessed_input = preprocess_input(test_tensors)
test_preprocessed_tensors = inceptionV3.predict(test_preprocessed_input, batch_size=32)
print("InceptionV3 TestSet shape", test_preprocessed_tensors.shape[1:])
valid_preprocessed_input = preprocess_input(valid_tensors)
valid_preprocessed_tensors = inceptionV3.predict(valid_preprocessed_input, batch_size=32)
print("InceptionV3 ValidSet shape", valid_preprocessed_tensors.shape[1:])
This 8x8x2048 tensor is used as an input for our own neural network. Let’s define it:
net_input = Input(shape=(8, 8, 2048))
net = GlobalAveragePooling2D()(net_input)
net = Dense(512, use_bias=False, kernel_initializer='uniform')(net)
net = BatchNormalization()(net)
net = Activation("relu")(net)
net = Dropout(0.5)(net)
net = Dense(256, use_bias=False, kernel_initializer='uniform')(net)
net = BatchNormalization()(net)
net = Activation("relu")(net)
net = Dropout(0.5)(net)
net = Dense(133, kernel_initializer='uniform', activation="softmax")(net)

dog_breed_model = Model(inputs=[net_input], outputs=[net])
dog_breed_model.summary()
The output of our neural network is a smaller vector that contains 133 different dog breeds. Please note - the ImageNet dataset used for training InceptionV3 already contains 120 dog breeds. However, not all dog breeds that are in the dogImages.zip archive are also found in ImageNet. It is, namely, those images that are the most interesting - can we “reuse” a very deep neural network like ImageNet in order to classify images that it has never seen? Train the model for 50 epochs to find out:
dog_breed_model.compile(loss='categorical_crossentropy', optimizer=Adam(lr=1e-04), metrics=['accuracy'])
checkpointer = ModelCheckpoint(filepath='dogbreed_model.hdf5', verbose=1, save_best_only=True)
dog_breed_model.fit([train_preprocessed_tensors], train_targets,
          validation_data=([valid_preprocessed_tensors], valid_targets),
          epochs=50, batch_size=4, callbacks=[checkpointer], verbose=1)
Let’s test the Top-1 Accuracy accuracy:
dog_breed_model.load_weights('dogbreed_model.hdf5') # in case you haven't train it
predictions = dog_breed_model.predict([test_preprocessed_tensors])
breed_predictions = [np.argmax(prediction) for prediction in predictions]
breed_true_labels = [np.argmax(true_label) for true_label in test_targets]
print('Test accuracy: %.4f%%' % (accuracy_score(breed_true_labels, breed_predictions) * 100))
With a Top-1 Accuracy of 89.1148%, it is even better than the general InceptionV3 Top-1 Accuracy of 78%.
The Real-Time Dog Breed Classification Application
On the video above you can see that I am running the Dog Breed Classification Service. The code is just a bit different than the Real-Time Image Classification Service. Let’s take a look! Load both the InceptionV3 and the Dog Breed models:
inception_model = InceptionV3(weights='imagenet', include_top=False)

net_input = Input(shape=(8, 8, 2048))
net = GlobalAveragePooling2D()(net_input)
net = Dense(512, use_bias=False, kernel_initializer='uniform')(net)
net = BatchNormalization()(net)
net = Activation("relu")(net)
net = Dropout(0.5)(net)
net = Dense(256, use_bias=False, kernel_initializer='uniform')(net)
net = BatchNormalization()(net)
net = Activation("relu")(net)
net = Dropout(0.5)(net)
net = Dense(133, kernel_initializer='uniform', activation="softmax")(net)

dog_breed_model = Model(inputs=[net_input], outputs=[net])
dog_breed_model.summary()
dog_breed_model.load_weights('dogbreed_model.hdf5')
Start the service that is making predictions for each incoming image:
# Kafka Service
consumer = KafkaConsumer('classificationimage', group_id='group1',bootstrap_servers=KAFKA_BROKER_ADDRESS)
producer = KafkaProducer(bootstrap_servers=KAFKA_BROKER_ADDRESS)
for message in consumer:

    # transform image
    image_data = base64.b64decode(message.value.decode())
    pil_image = Image.open(BytesIO(image_data))
    image_array = img_to_array(pil_image)
    image_batch = np.expand_dims(image_array, axis=0)
    processed_image = preprocess_input(image_batch.copy())

    # make predictions
    inception_v3_predictions = inception_model.predict(processed_image)
    predictions = dog_breed_model.predict(inception_v3_predictions)

    # transform predictions to json
    label = LabelRecord(predictions)
    label_json = label.toJSON()

    # send encoded label
    producer.send('classificationlabel', label_json.encode())
Note how the predictions made by the InceptionV3 network are used as input to the DogBreed neural network trained by us. On the video above you can see me classifying dogs from the tests that are from breeds, which have been unknown to the InceptionV3 network. If you are a dog breed expert you will notice that all dogs are classified correctly.
Need help?
If you need some help running the above code, feel free to contact me! Make sure you checkout the code in both repos generic-realtime-image-classification-webapp and realtime-image-classification-kafka-service. Have fun!